Working with Dr Dental IQ
step by step, from zero to hero
This guide walks you through every part of the platform — from your first login to professional reporting. Designed for dentists, receptionists, technicians and clinic managers. Every step is explained with mockup screenshots.
Screen gallery — a tour of the app
Real screens from Dr Dental IQ. Click any image to enlarge.

Welcome to Dr Dental IQ
Hi and welcome! This guide is designed to help you make the most of every Dr Dental IQ feature in the shortest time possible. Whether you are a dentist, receptionist, clinic manager or lab technician — follow this guide step by step.
This guide is for you if…
- You are new to Dr Dental IQ and want to learn
- You have added a new team member and want to onboard them
- You are looking for a quick fix to a specific issue
- You want to explore every capability of the platform
How to use this guide
- Use the sidebar contents to jump to any chapter
- If you are new, follow the chapter order (1 to 20)
- Each chapter has hands-on steps — keep the system open and follow along
- Pay attention to colored callouts — they highlight important notes
Callout legend
Before you start, get these ready
🌐 Stable internet
At least 2 Mbps. WiFi or wired connection.
💻 Modern browser
Recent Chrome, Firefox, Safari or Edge.
📱 Phone with WhatsApp
For login codes and reminders.
🎯 Learning goal
After this guide you should be able to: register patients, schedule appointments, fill an Odontogram, write treatment plans, issue invoices, and pull reports — all independently and professionally.
Logging In
Login URL
To access the system, open this URL in your browser:
https://drdentaliq.com
Then click the "Login" button at the top corner.
Sign in to Dr Dental IQ
Enter your email and password
Login steps
- Enter email and password Enter the email and password you received at signup. For your first login, a temporary password has been emailed to you.
- Change the temporary password After your first login, the system asks you to choose a new password. At least 8 characters, with uppercase, number and symbol.
-
Enable 2FA (two-factor authentication)
Install
Google AuthenticatororAuthyon your phone. Scan the QR code shown. Enter the 6-digit code. - Save backup codes You will be given 10 one-time codes. Keep them somewhere safe — if you lose your phone, use these to log in.
- Enter the dashboard Congratulations! You are now in the main dashboard.
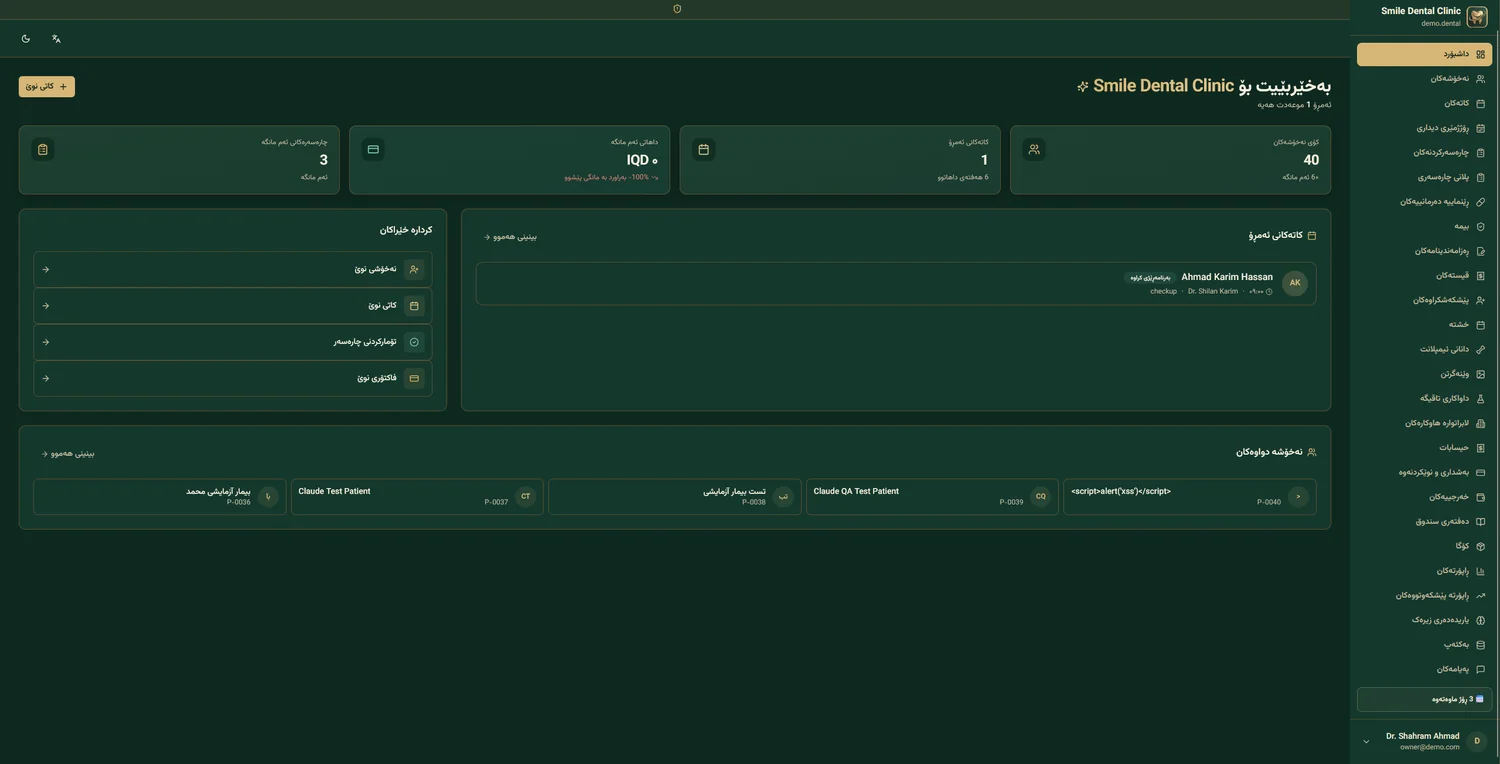
Dashboard Overview
After logging in, you land on the main dashboard. This page gives you an overview of your clinic. Here we explore each part.
Page layout
12
3
$820
2
9:30 — Sara Hosseini — Filling
10:00 — Ali Karimi — Root canal
Dashboard components
📊 Stat cards
Four cards on top: today's appointments, new patients this week, current month revenue, in-progress lab orders.
🕐 Upcoming appointments
List of today's and tomorrow's appointments with time, patient name, treatment type and doctor. Click any item for details.
📈 Revenue chart
30-day revenue trend as a line/bar chart. Compared with previous month.
🔔 Notifications
New patient tickets, payment reminders, new lab orders, allergy alerts.
⚡ Quick actions
Shortcut buttons for: register new patient, quick appointment, quick invoice, send WhatsApp.
🦷 Recent activity
List of recent changes: who did what, and when.
Sidebar menu
The main menu on the side contains all sections of the platform:
| Menu | Description | Access |
|---|---|---|
| 📊 Dashboard | Main page with stats and summary | All users |
| 👥 Patients | Patient records management | Doctor, receptionist, owner |
| 📅 Calendar | View and create appointments | Doctor, receptionist, owner |
| 📋 Treatment plans | Active and past plans | Doctor, owner |
| 🩻 Radiology | Uploaded images | Doctor, owner |
| 💊 Prescriptions | Issued prescriptions | Doctor |
| 🧾 Accounting | Invoices, payments, reports | Receptionist, owner |
| 🏭 Lab | Prosthetic orders | Doctor, owner |
| 📈 Reports | Financial and operational reports | Owner |
| ⚙️ Settings | Clinic and system settings | Owner |
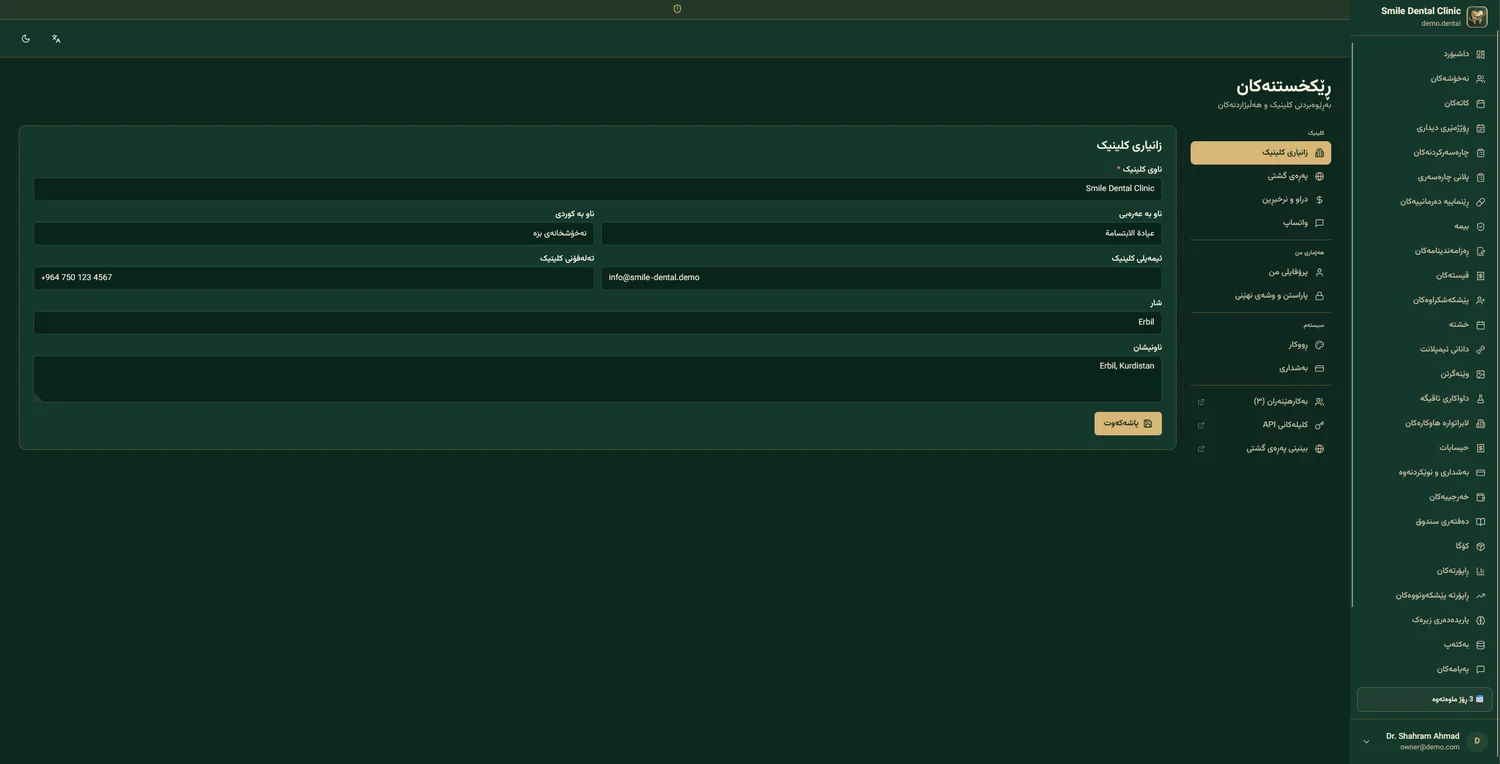
Initial Clinic Setup
For invoices, prescriptions and treatment plans to print professionally and for messages to send correctly, complete your clinic settings first.
Go to:
1. Basic information
2. Logo and branding
- Upload logo Click "Upload Logo". PNG or SVG with transparent background, at least 200×200 pixels. This logo appears on invoices, prescriptions, and your public page.
- Cover image Cover image for your clinic's public page. Suggested size: 1200×400 pixels. Can be a photo of your clinic or medical team.
-
Primary brand color
Hex color code (like
#0d9488) or one of the suggested palettes. This color is used on buttons and important headings.
3. Working hours
Set your clinic's working days and hours. These hours apply to online booking — patients can only book during these times.
| Day | Status | From | To | Break |
|---|---|---|---|---|
| Saturday | Open | 9:00 | 21:00 | 13 — 14 |
| Sunday | Open | 9:00 | 21:00 | 13 — 14 |
| Monday | Open | 9:00 | 21:00 | 13 — 14 |
| Tuesday | Open | 9:00 | 21:00 | 13 — 14 |
| Wednesday | Open | 9:00 | 21:00 | 13 — 14 |
| Thursday | Open | 9:00 | 18:00 | — |
| Friday | Closed | — | — | — |
4. Currency and tax
- Default currency: Dollar (USD), Iraqi Dinar (IQD), or Iranian Rial (IRR)
- Secondary currency: if you want invoices to show both currencies
- Exchange rate: manual or automatic from the server
- Tax: default tax percentage on invoices (optional)
5. Invoice template and header
Set the invoice header text (e.g. "Dental Clinic…") and footer (registration number, address). These appear on every invoice.
Adding Users and Staff
Everyone using the system needs their own account. This gives three benefits: security (each person sees only what they're allowed), accountability (every change is recorded with the user's name), and accurate reporting (e.g. revenue per doctor, performance per receptionist).
Go to:
Add a new user
- Click "+ Add User" The green button at the top corner of the page.
- Enter information Full name, email (used to log in), mobile number, user type.
- Choose role One of: Owner, Doctor, Receptionist, Technician, or custom role. Each has different access (see table below).
- Set temporary password Set a temporary password. The user must change it on first login.
- Send invitation A welcome email with the login link and quick-start guide is sent to the user.
Roles and access (RBAC)
| Capability | Owner | Doctor | Receptionist | Technician |
|---|---|---|---|---|
| View patient records | ✓ | ✓ | ✓ | ✗ |
| Edit Odontogram | ✓ | ✓ | ✗ | ✗ |
| Issue prescriptions | ✓ | ✓ | ✗ | ✗ |
| Issue invoices | ✓ | ✗ | ✓ | ✗ |
| View financial reports | ✓ | ✗ | ✗ | ✗ |
| Manage users | ✓ | ✗ | ✗ | ✗ |
| Clinic settings | ✓ | ✗ | ✗ | ✗ |
Doctor commission setup
For each doctor, you can set a commission percentage or fixed amount. This is automatically calculated from that doctor's invoices.
- Go to the doctor's profile Click the doctor's name in the user list.
- "Accounting" tab Side tab "Accounting & Commission".
- Set percentage or amount For example 40% of invoice amount, or a fixed amount per treatment type.
- Save From now on, all invoices for that doctor calculate commission automatically.
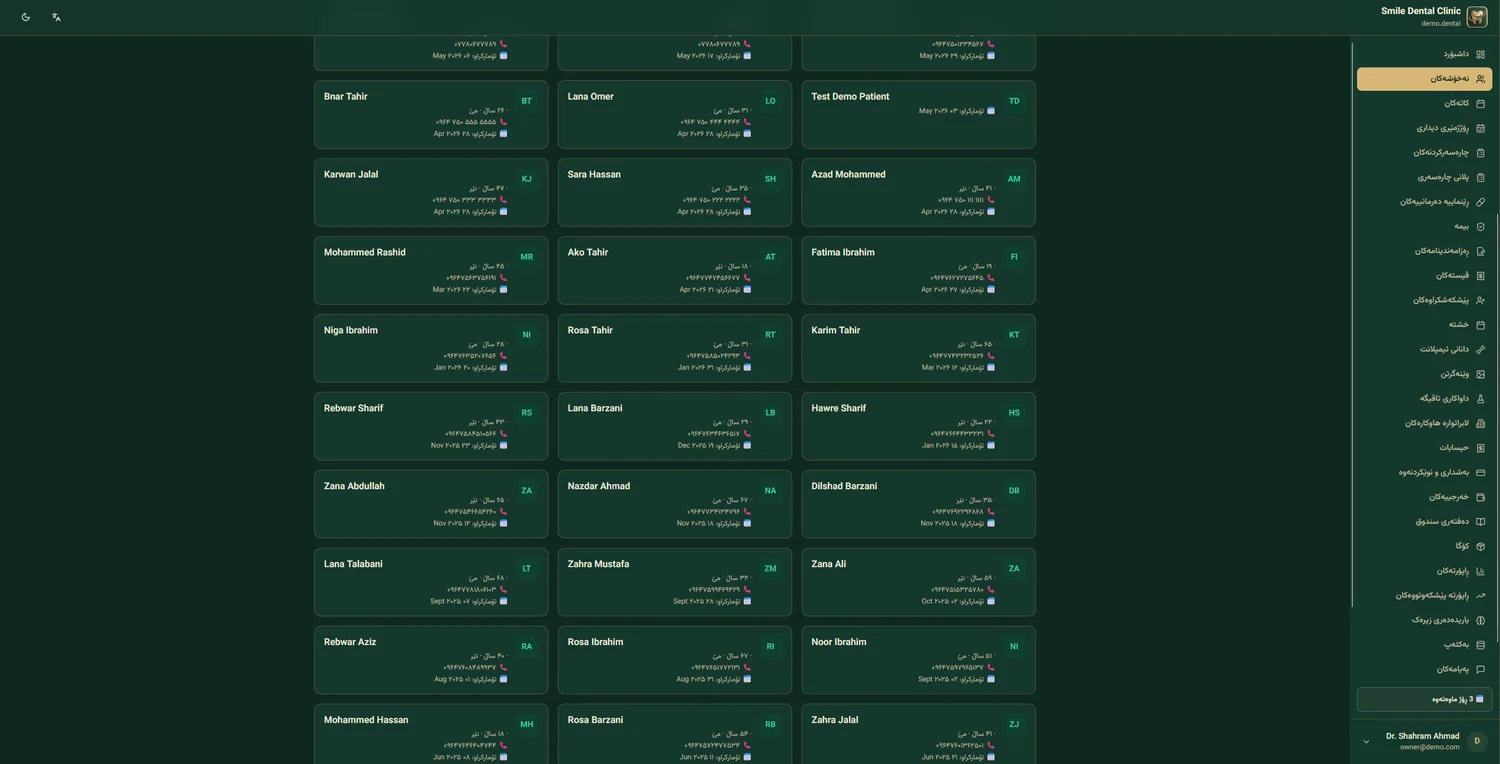
Registering a New Patient
Patient registration is the first thing you do for any new person. Complete info = better treatment and more accurate reports.
Go to:
Or the shortcut Ctrl + P.
Patient form — "Identity" tab
Required vs optional fields
⚠️ Required
First name, last name, mobile number. Without these three you cannot register a patient.
✓ Optional
National ID, date of birth, address, occupation, blood type. The more you fill, the more accurate the reports.
"Medical History" tab
This tab is clinically very important. Info here is shown on every page dealing with the patient's treatment.
- Drug allergies — like penicillin, aspirin, local anesthetic. Any item selected triggers a red warning banner across all the patient's pages.
- Chronic conditions — diabetes, hypertension, cardiac issues, bleeding disorders. Important for prescriptions and surgery.
- Current medications — what the patient is currently taking. The system auto-checks drug interactions.
- Smoking status — smoker / non-smoker / former smoker. Affects treatment course and healing.
- Pregnancy — for female patients, very important for radiology and prescriptions.
"Photos & Attachments" tab
- Patient photo Click the upload box or drag a file. JPG or PNG. This photo is used everywhere for quick identification.
- National ID scan Optional but recommended — for physical archive.
- Insurance documents If the patient has insurance, upload a copy of the insurance card.
Searching patients
To find a patient:
- Top search bar: by name, mobile, or patient code
- Advanced filter: by doctor, treatment type, last visit date, city
- Keyboard shortcut: Ctrl + K — quick search from any page
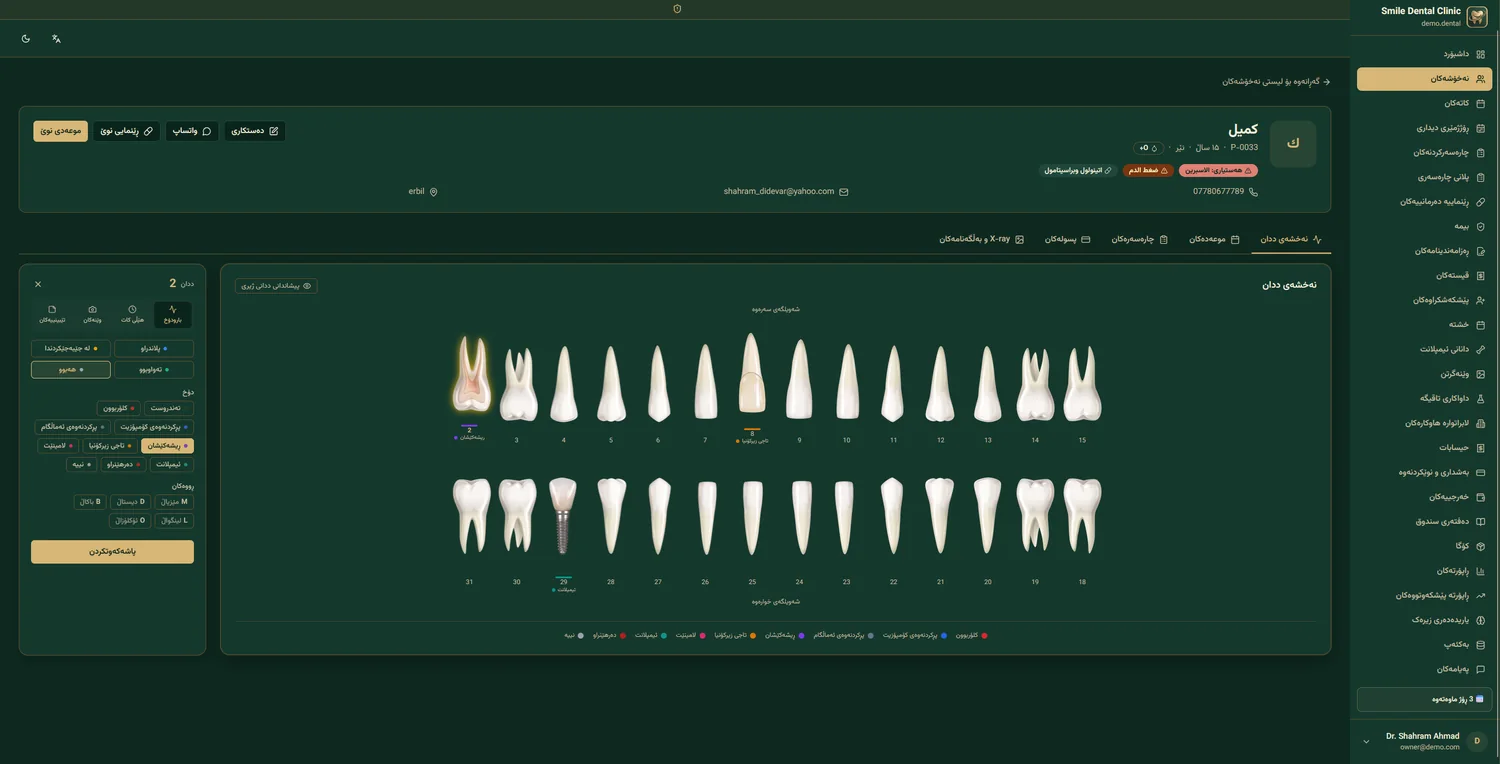
Working with Odontogram
The Odontogram is a map of the patient's teeth. 32 teeth, each with 5 surfaces, where you can record the status of each surface separately. A full change history is also kept.
Go to:
Chart structure
Teeth are numbered using the international FDI standard:
- Upper right quadrant: 11–18 (permanent) / 51–55 (deciduous)
- Upper left quadrant: 21–28 / 61–65
- Lower left quadrant: 31–38 / 71–75
- Lower right quadrant: 41–48 / 81–85
The five surfaces
Mesial
Surface near the midline
Distal
Surface away from the midline
Occlusal
Chewing surface (top)
Buccal / Labial
Outer surface (lip/cheek)
Lingual / Palatal
Inner surface (tongue/palate)
32 × 5 = 160 points
Each one independently recordable!
How to record status
- Click the tooth The tooth chart enlarges and its 5 surfaces become clickable.
- Pick a surface Click Mesial, Distal, Occlusal, Buccal or Lingual.
- Pick a status A small dialog opens with 14 options: healthy, decay, filled, root-canal done, root-canal needed, crown, implant, bridge, extracted, deciduous, impacted, cracked, broken, has note.
- Optional note You can add a comment (e.g. "deep decay, possibly needs root canal").
- Save The change is recorded instantly. History entry: "Tooth 16, Occlusal, 2026/05/04, Dr. Shilan: decay"
14 recordable statuses
Event-sourced history
Every Odontogram change is stored as a separate "event". This means:
- You can see which tooth, on what date, by which doctor, was changed how
- You can pick a "point in time" — e.g. "Odontogram state 6 months ago"
- You can compare two points in time to show treatment progress
Print the Odontogram
- "🖨 Print" button at the top corner Click this button.
- Choose options With/without logo, with/without patient info, color/black-and-white.
- A4 print A professional, print-ready PDF is generated. Suitable for physical archive or submission to insurance.
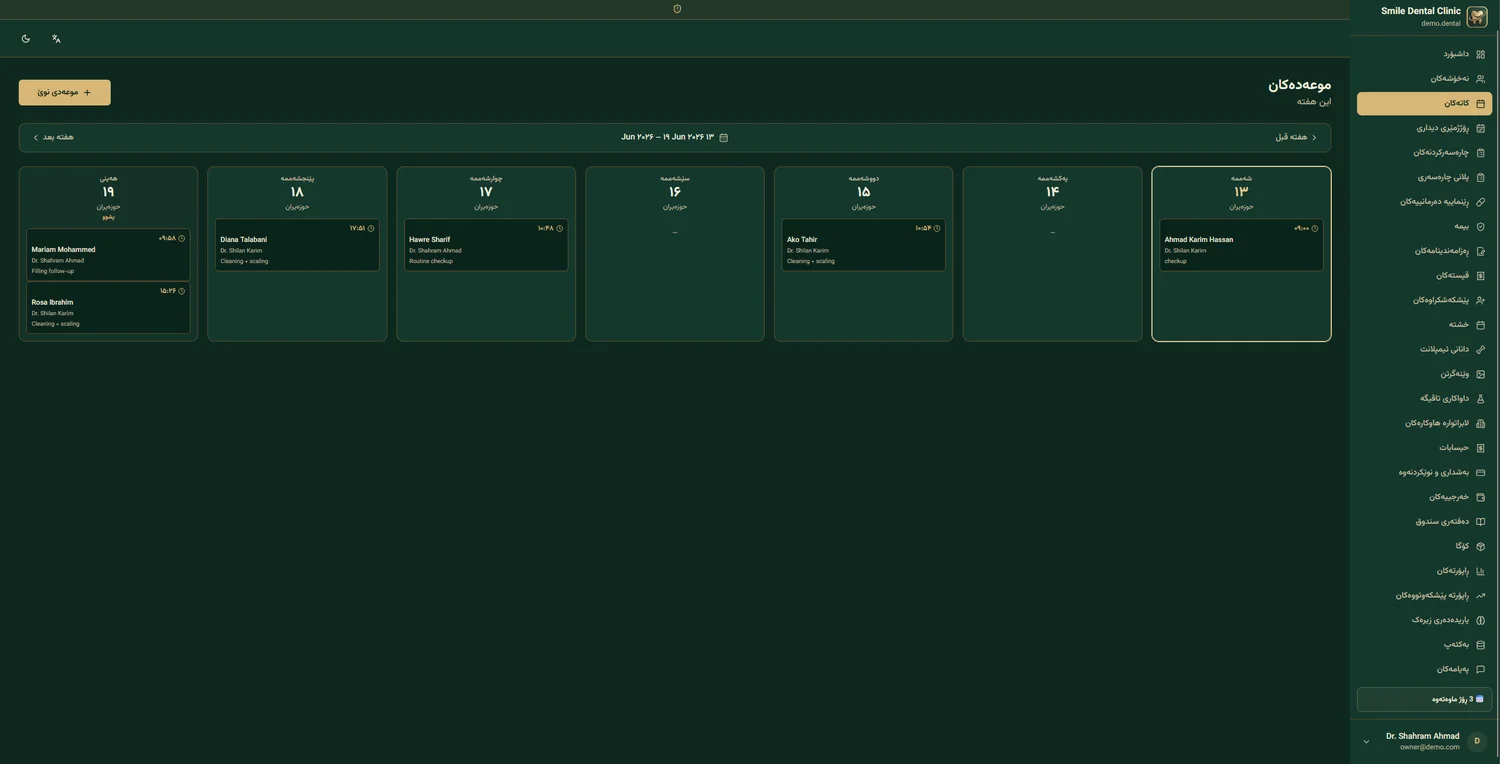
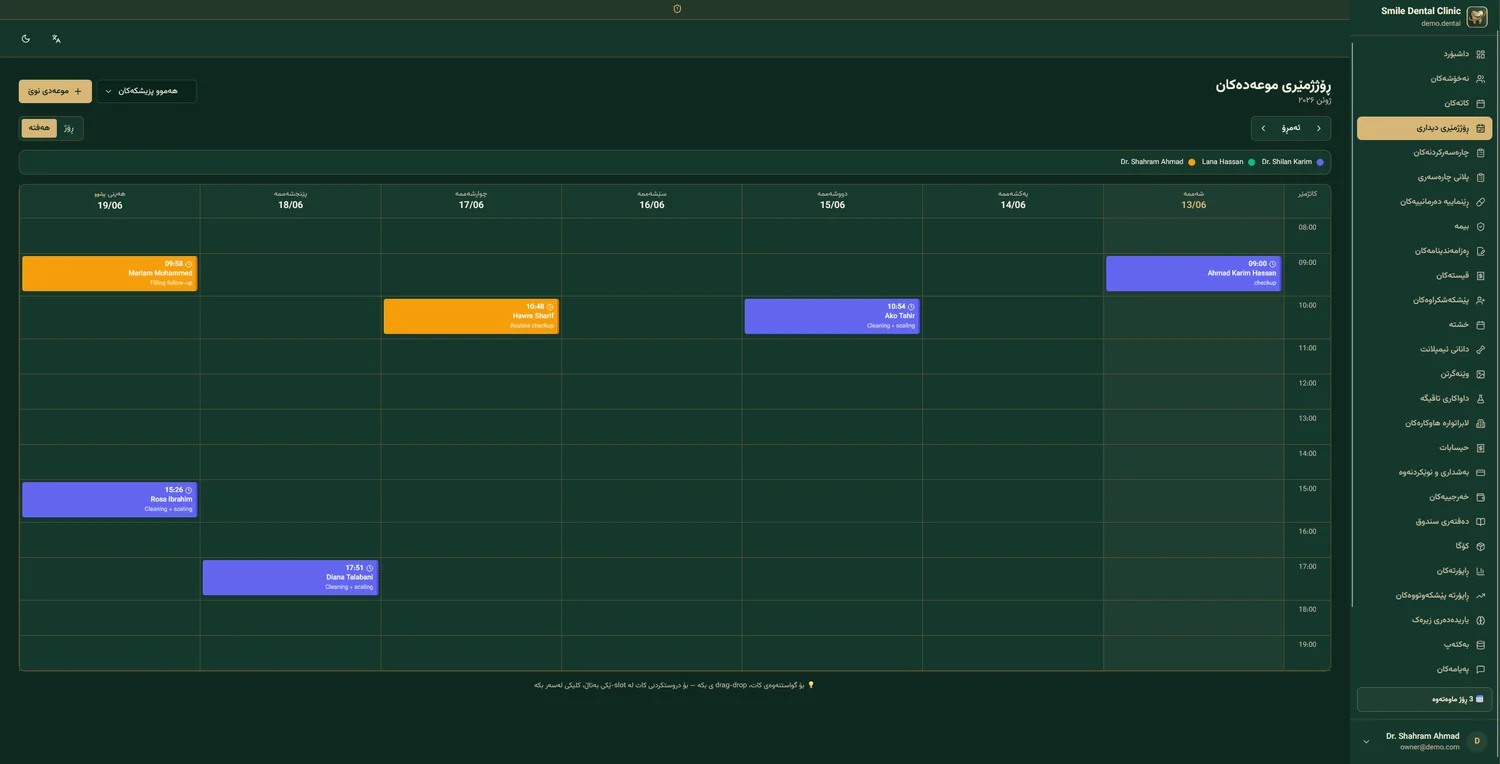
Calendar & Appointments
Go to:
Three calendar views
📆 Day view
All appointments for a day with exact times. Ideal for morning prep.
📅 Week view
The whole week at a glance. Ideal for weekly planning.
🗓 Month view
Big-picture month with appointment density (colored heatmap).
Schedule a new appointment
- Click the desired time In day or week view, click on an empty slot. Or use the "+ New Appointment" button at the top.
- Select patient Type the patient name — autocomplete suggests matches. For a new patient, click "+ New Patient" (registers in the same dialog).
- Select doctor and unit If you have multiple doctors, select one. If you have multiple rooms/units, set the unit.
- Treatment type Such as: exam, scaling, root canal, filling. This helps the system auto-set the duration.
- WhatsApp reminder Tick "Send automatic reminder". 24 hours before, a message goes to the patient's WhatsApp.
- Save The appointment appears on the calendar. The patient receives a confirmation message.
Move an appointment with drag & drop
If you need to move an appointment to a different time:
- Click and hold the appointment
- Drag to the new time/day
- Release — system asks for confirmation
- Confirm — a reschedule message is automatically sent to the patient
7 appointment statuses
| Status | When to use |
|---|---|
| 📝 Draft | Appointment booked but reminder not yet sent |
| 📨 Reminder sent | Message sent, awaiting patient confirmation |
| ✓ Confirmed | Patient confirmed — final |
| ⏳ In progress | Patient arrived, treatment underway |
| ✅ Completed | Treatment finished |
| ❌ No-show | Patient didn't come and didn't notify |
| ⏸ Cancelled | Cancelled before the time |
AI no-show prediction
When scheduling, if the patient has a no-show history, a probability indicator is shown:
The AI analyzes history (past no-shows, distance from clinic, treatment type, time of day) to make this prediction.
Block a time slot
If you want to mark a time block as busy (e.g. internal meeting, break, day off):
- Click "+ Block Time" (red button at the top)
- Enter the date, start and end time
- Reason for the block (optional)
- Save — this slot also becomes unavailable for online booking
Treatment Plan
A treatment plan is a "roadmap" for the patient — all steps with prices, session counts and explanations. The patient sees it, approves, signs, and treatment begins.
Go to:
Step-by-step plan creation
- Plan title Like "Comprehensive Treatment — Phase 1" or "18-month Orthodontics". Specific and descriptive.
- Add treatments Click "+ Add Treatment". Pick from the list (exam, scaling, root canal, crown, implant, …) or enter a custom code.
- Select tooth Click the desired tooth on the Odontogram. Example: root canal for tooth 16.
- Pricing The default price (set in Settings) is shown. Adjust it for this patient if needed.
- Sessions and duration E.g. root canal = 2 sessions, each 45 minutes. This helps schedule appointments.
- Notes and side effects Important notes, possible side effects, alternative options. These appear on the printed form.
- Discount and tax Apply discount here if you give one. Tax is added automatically.
- Preview and save Click "Preview PDF" to see how it prints. If everything is fine, save.
12+ predefined treatment types
Patient digital signature
- Show the plan on screen Open it in patient view on your tablet or phone.
- Patient signs with finger or stylus A signature box appears. The patient signs on screen as they would on paper.
- Save with timestamp The signature is saved in the PDF with exact date and time — legally reliable.
Progress tracking
Each treatment in the plan has a status:
- Planned — not yet started
- In progress — sessions underway
- Completed — done
- Cancelled — removed from plan
Total plan progress is shown at the top of the page. E.g. "60% of plan completed".
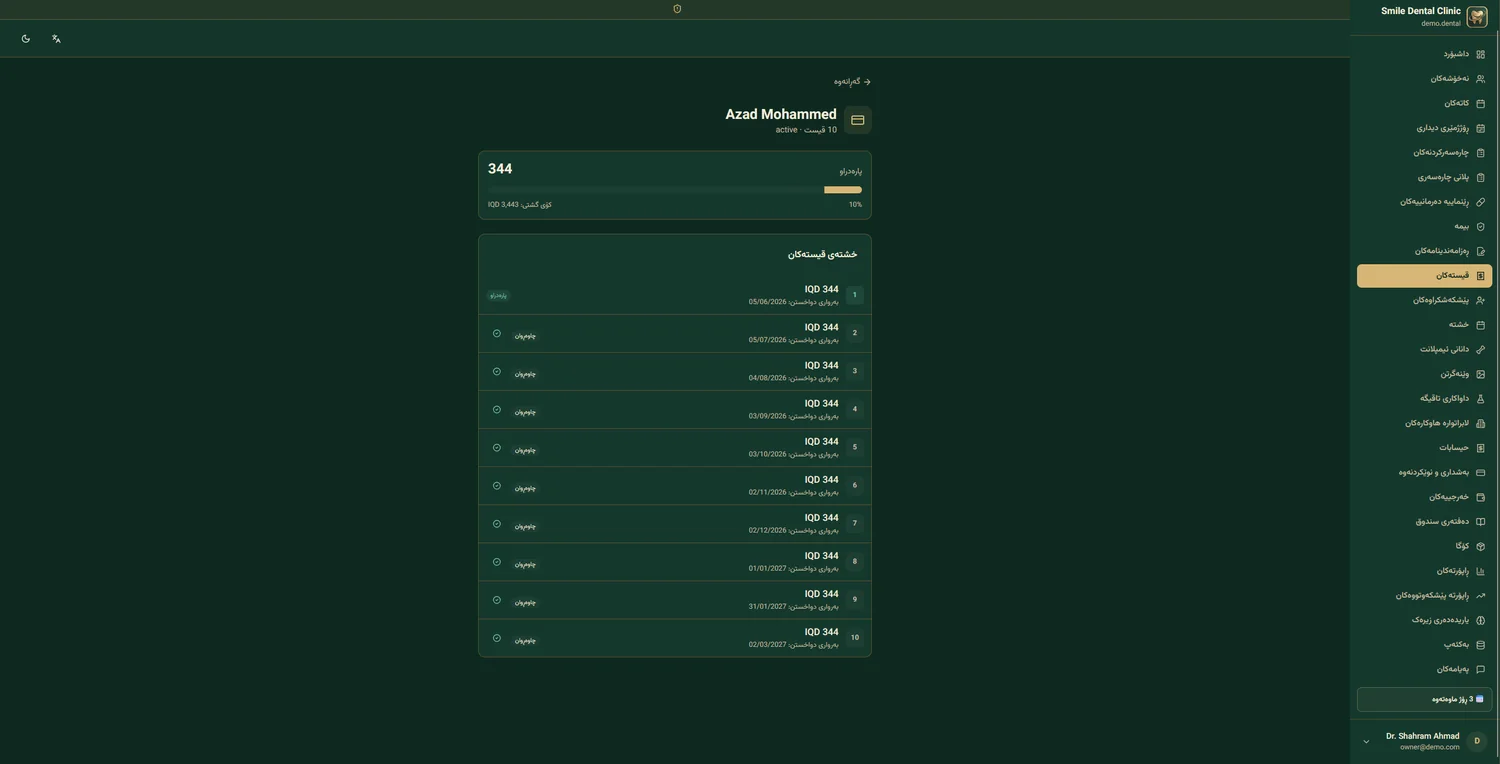
Convert to invoice
When a treatment in the plan is completed, with one click "Convert to Invoice" issues the invoice for that step:
- Select the completed treatment
- Click "Create Invoice"
- Set installment count (one-time or multi-installment)
- Invoice is issued and sent (WhatsApp or print)
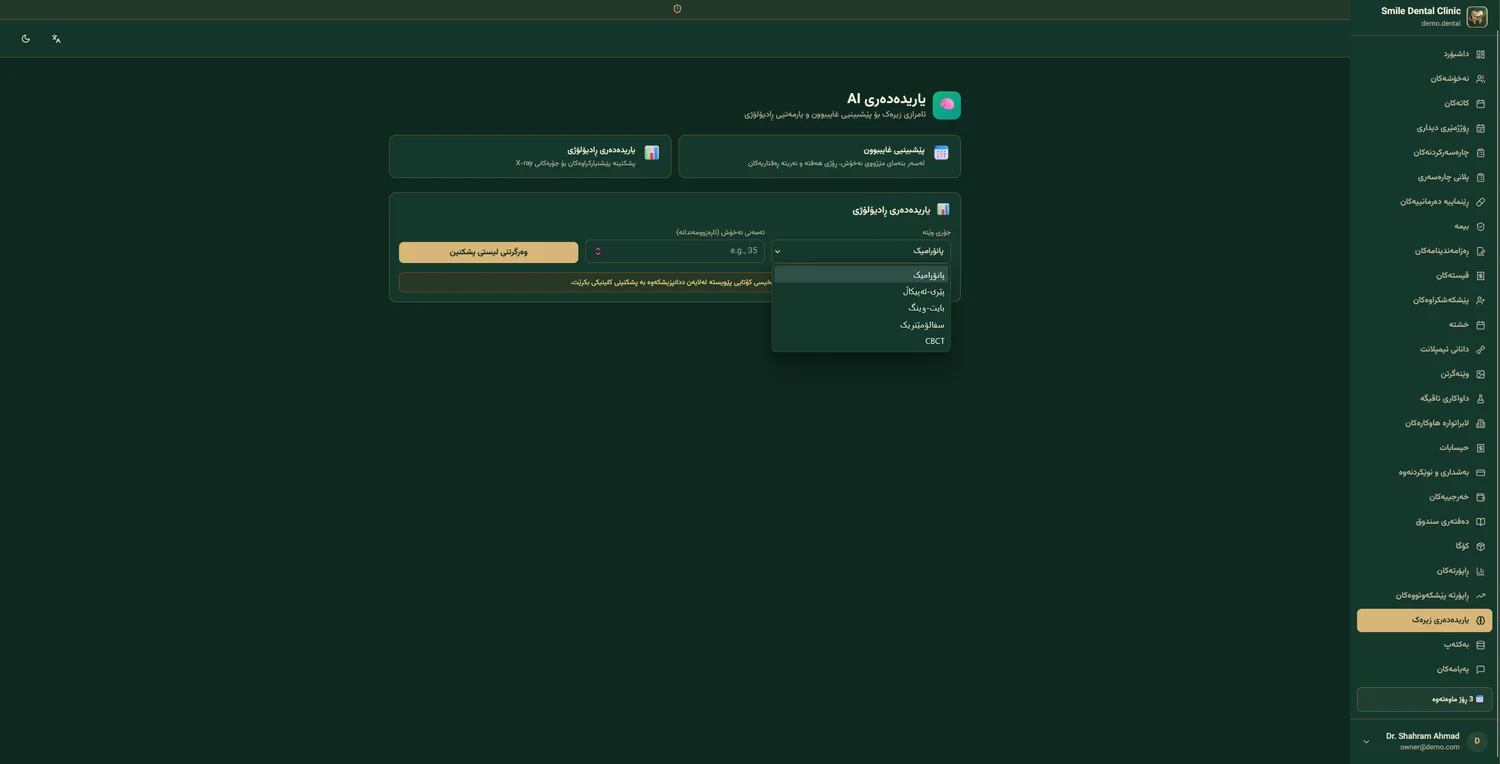
Radiology + AI
Go to:
Upload radiograph
- Click "+ Upload Radiograph" Green button at the top of the tab.
- Select type Periapical, bitewing, panoramic, cephalometric, CBCT (DICOM), or intraoral photo.
- Drag file or select from computer JPG, PNG for regular images. DICOM for CBCT. Up to 20 MB.
- Tag tooth (optional) If the image relates to a specific tooth, enter its number (e.g. 16).
- Note E.g.: "before root canal", "after filling".
- Save The image is uploaded (to Cloudflare R2 — fast and secure).
AI analysis (GPT-4o)
For panoramic and periapical, you can use smart analysis:
- Click the image The viewer dialog opens.
- Click "🤖 Analyze with AI" Purple button at the top.
- Wait (10–20 seconds) The AI analyzes the image. You can do other things in parallel.
-
Review findings
The AI reports:
▸ "Suspected decay on tooth 16 — 82% confidence"
▸ "Abnormal bone density in zone 26"
▸ "Possible apical infection on tooth 46 — 91% confidence" - Approve or reject findings The doctor approves, rejects, or edits each finding. Only approved findings are added to the file.
Compare two images (before/after)
- Click "Compare"
- Select two images (e.g. before and after treatment)
- A two-column layout shows both images side by side
- Synchronized zoom and pan — zooming one zooms the other
Patient gallery
All a patient's images are stored in a date-sorted gallery. You can:
- Filter by image type (panoramic, periapical, …)
- Filter by date (e.g. all 2026 images)
- Download all images as a ZIP
- Share with the patient via the portal
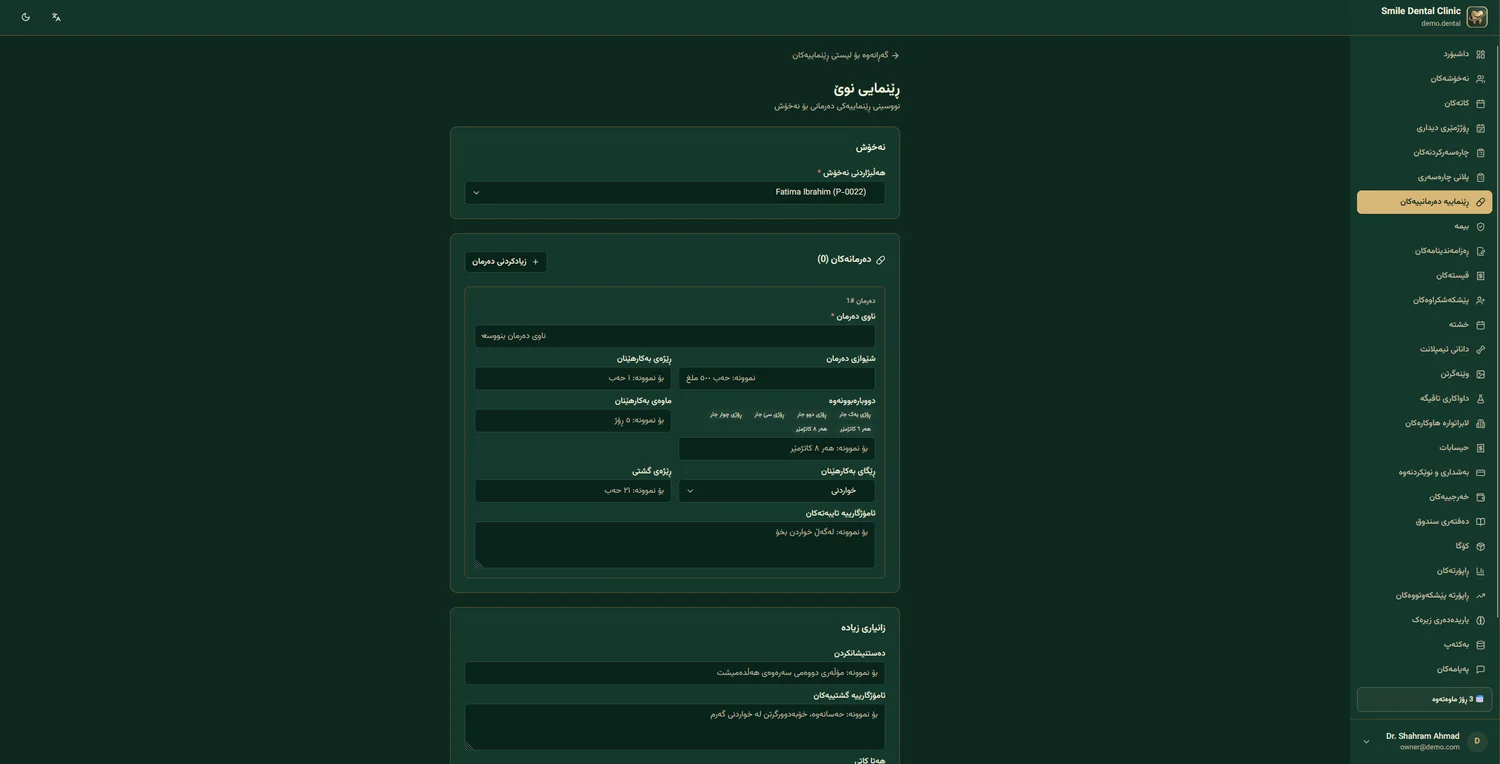
Prescriptions
Go to:
Prescription steps
- Add medication Start typing the drug name (brand or generic) in the search box. Autocomplete suggests matches. E.g.: "Amoxicillin".
- Dosage and frequency E.g.: 500 mg, every 8 hours. Structured fields — no need to write a paragraph.
- Duration E.g.: 7 days, or until medication runs out.
- Conditions With food, on empty stomach, before bed, with plenty of water, …
- Add more medications Click "+ Add Medication". You can include multiple drugs in one prescription.
- Additional notes If there's something special (e.g. "Call us if fever exceeds 38°C").
- Preview and print or send A4 or A5, with QR verification code, medical license number, electronic signature.
Automatic drug interaction check
If a drug you prescribe interacts with:
- The patient's allergies → red warning banner
- The patient's current medications → yellow warning banner
- The patient's condition (pregnancy, kidney failure, …) → red banner
Copy previous prescription
If the patient is returning and you want the same previous prescription:
- Go to the "Previous Prescriptions" tab
- Select the desired prescription
- Click "📋 Copy to new"
- Edit if needed, then issue
Send prescription via WhatsApp
- After issuing the prescription Click "💬 Send to WhatsApp".
- Message preview A ready message with the prescription PDF link is shown.
- Confirm send The message is automatically sent to the patient's WhatsApp. The patient can download the PDF or show it at the pharmacy.
Invoices & Accounting
Go to:
Issue an invoice
- Select patient Type the patient name — autocomplete helps.
- Add items Add treatments one by one. You can use "Import from Treatment Plan" — completed treatments are added automatically.
- Price and discount Each treatment's default price is shown. Apply percentage or amount discount on each item or whole invoice.
- Invoice currency USD, IQD, or IRR. If the patient wants to pay in a different currency, you can set the exchange rate.
-
Installment setup (optional)
If the patient pays in installments:
- Number of installments (2 to 24)
- Amount per installment (or split equally)
- Due date of each installment
- Preview and issue Click "🖨 Preview" to see the invoice before issuing. Then "✓ Issue Invoice".
Record payment
When the patient makes a payment:
- Go to the invoice
- Click "+ Record Payment"
- Enter amount, date, payment method (cash, card, transfer, online)
- Specify which installment this payment is for
- Save — the invoice balance updates
Online payment gateway
The patient can pay online via the portal or a sent link:
🇮🇶 ZainCash
For Iraq and Kurdistan. Patients pay with the ZainCash app.
🇮🇷 ZarinPal
For Iran. Connects to all banks and Shetab cards.
🌐 Stripe
For international payments. Visa/Mastercard credit cards.
Print invoice
- Official A4 — for archive, insurance, accounting
- POS thermal receipt — for the small printer at the front desk
- WhatsApp PDF — sent directly to the patient
Daily financial report
At the end of each workday, see a summary report:
- Number of invoices issued today
- Today's total revenue
- Today's payments received (split by cash, card, online)
- Outstanding patient debts
- Lab orders issued
Lab Orders
If your clinic is connected to a prosthetic lab, you can order directly from the system — no phone calls, no SMS, with live 12-stage tracking.
Initial lab connection
(One-time setup)
-
Get an invite code from the lab
Your chosen lab must be a Dr Dental IQ member. Get an 8-character code from them (like
DENT-XK29). - Enter the code in the system Path: Settings → Connected Labs → + New Connection. Enter the code.
- Lab confirmation The lab confirms the connection. From now on you can place orders.
drdentaliq.com/lab. Connection is free for our clinic clients.
Place a new order
- Go to the path 🏭 Lab→+ New Order
- Select patient Patient info is filled in automatically.
- Select lab If you have several connected labs, pick one.
- Work type PFM crown, Zirconia, bridge, All-on-X, implant crown, full denture, …
- Target tooth Pick the tooth/teeth on the Odontogram.
- Technical specs Shade (Vita), size, material, special notes.
- Upload files Scan (STL), intraoral photo, X-ray. Up to 50 MB per file.
- Expected delivery date E.g. 10 working days.
- Send The order goes to the lab. They get a push notification.
12-stage order tracking
Each order passes through these stages. At any moment you see where the order is:
Chat with the lab
If you have questions (color, size, model), every order has a chat box:
- Write a message — the lab sees it instantly
- Attach photos or files
- Chat history is always saved
Lab statement
Every clinic has a separate balance with each lab. At month-end:
- A per-pair statement is auto-generated
- All orders + payments + closing balance shown
- You can make a payment (cash, transfer) — record it, the balance decreases
Patient Messaging
The system sends important messages to patients automatically, but you can also send manual messages.
Automatic system messages
These messages send themselves at the right time (when enabled):
| Message | When sent | Channel |
|---|---|---|
| Booking confirmation | Instant | WhatsApp + Email |
| 24-hour appointment reminder | 24 hours before | |
| Installment due soon | 3 days before | WhatsApp + SMS |
| Thank-you after visit | 24 hours after | |
| Birthday wish | Birthday 8 AM | |
| 6-month checkup reminder | 6 months after last visit | WhatsApp + SMS |
Configure automatic messages
Go to:
- Pick the message type E.g. "24-hour appointment reminder".
- Enable/disable If you don't want this message sent, turn it off.
-
Edit text
The default text is shown. You can change it. Use these variables:
{{patient_name}}·{{appointment_time}}·{{doctor_name}}·{{clinic_name}} - Language Each message in 4 languages (FA/Kurdish/AR/EN). Sent in the patient's mother tongue.
- Save Changes apply from this moment.
Send a manual message
To send a manual message to a patient:
- Open the patient record
- Click "💬 Send Message"
- Write the message
- Pick the channel: WhatsApp, SMS, or both
- Send — see delivery status within seconds
Group campaign
To send a message to a group of patients (e.g. everyone absent for 6 months), see Chapter 16 — Marketing Campaigns.
Public Clinic Page
Every clinic gets an automatic public page at:
drdentaliq.com/c/your-clinic-slug
or you can connect it to your own custom domain (e.g. www.smileclinic.iq).
Edit your public page
Editable content
🖼 Cover image
Large image at the top of the page. 1200×400 px. Can be a photo of the clinic or the team.
📝 About / description
A few sentences about the clinic, its history and specialties. 200–500 words.
👨⚕️ Doctors
Photo, name, specialty, background. Each doctor gets a card.
🦷 Services + prices
Treatment list with rough prices (optional). Helps patients know before contacting.
⭐ Patient reviews
After a visit, the patient can leave a review. You approve it and it appears on the page.
📍 Address & map
Embedded Google Map + "Get Directions" button.
📱 Social networks
Instagram, Telegram, Facebook, YouTube, TikTok — links.
📞 Contact info
Phone, WhatsApp, email, working hours — all displayed.
Online booking
On the public page, a patient can book without logging in:
- The patient clicks “Book online” The large green button at the top.
- They pick a doctor, day and time Only free time slots are shown.
- They enter their contact details Name, mobile number, treatment type (optional).
- WhatsApp verification code A 6-digit code is sent to their WhatsApp to confirm the number is correct.
- Final confirmation The appointment is booked. The clinic gets a push notification. Reception gives final confirmation.
www.smileclinic.iq) in Settings → Custom domain add it. Our team helps you set it up for free.
SEO & Google presence
Your public page automatically:
- is indexed by Google
- meta tags and schema.org are filled in
- an XML sitemap is generated
- fast load speed (green Core Web Vitals)
So when someone searches Google for “dental clinic Erbil”, they will likely see your page.
Marketing Campaigns
Go to:
Step-by-step campaign creation
- Campaign title E.g. "Autumn checkup 20% off" or "6-month patient recall".
- Campaign goal One of: acquire new patients, win back old ones, promote a specific service (e.g. whitening), holiday greeting.
-
Patient segmentation
Who receives the message? Filter by:
- Age (e.g. 20 to 40)
- Gender
- City
- Last visit (e.g. 6+ months ago)
- Past treatment type
- Referral source
- Debt (e.g. only patients with zero debt)
- Preview list The system shows how many patients fall in this segment. E.g. "423 patients".
- Message text Write the WhatsApp or SMS message. You can include a discount code.
- Send time Now, or scheduled for a specific day/hour. Recommended: working hours.
- Confirm and send The message goes to all patients in the segment.
Ready-made campaign types
🎁 Discount coupon
Single-use or multi-use code, with time and count limits.
🎂 Birthday wishes
Automatic message + gift (free checkup, discount).
🌙 Holidays
Norouz, Ramadan, Eid al-Fitr, Christmas, New Year.
⭐ Loyalty program
Each visit = points. 100 points = a free session.
👥 Refer a friend
Patient refers a friend, both receive a gift.
🦷 Checkup reminder
6 months after last visit, automatic.
Campaign ROI report
After sending, you see a live report:
- Sent: how many messages went out
- Delivered: how many reached the phone
- Read: how many opened it
- Clicks: how many clicked the booking link
- Booked: how many actually booked
- Revenue generated: total amount of treatments performed
- ROI: profit ratio to campaign cost
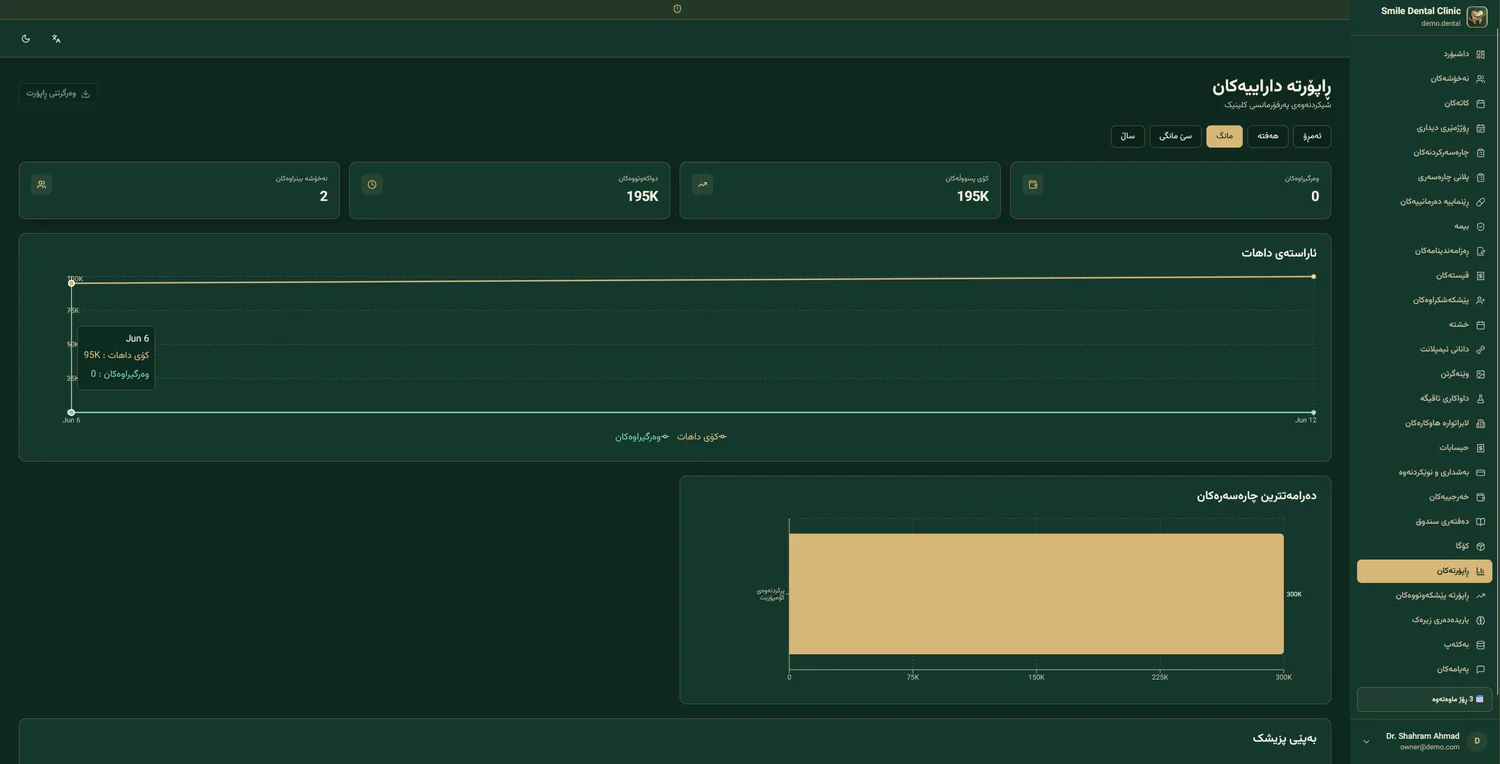
Reports & Analytics
Go to:
Financial reports
💵 Daily / monthly revenue
Trend chart, currency breakdown, comparison with the previous period.
👨⚕️ Revenue per doctor
Total, commission, net — by month and treatment.
🦷 Revenue per treatment type
Which treatments are most profitable? Top 10.
💸 Clinic expenses
Rent, salaries, materials, marketing — as a % of the total.
📊 Net profit
Revenue − expenses = real profit. Monthly trend.
⏰ Patient debts
List of patients in debt + days overdue.
Operational reports
📅 No-show rate
What % of patients miss appointments? By day and hour.
⏱ Average treatment time
How long does each treatment take? Which doctor is fastest?
👥 New vs returning patients
% of new patients this month, by referral source.
🎯 Acquisition channel
Instagram, Google, WhatsApp, referral — which is best?
⭐ Patient satisfaction
Average stars, 12-month trend, review keywords.
📦 Lab report
Order count, turnaround time, rejection rate, cost per clinic.
How to build a report
- Pick a report from the side menu
- Time range — e.g. “this month”, “last 3 months”, or a custom date
- Filters — specific doctor, treatment type, city, currency
- Display type — table, line chart, bar chart, pie chart
- Apply — the report is shown on screen
- Export — Excel, PDF, or direct print
Scheduled reports
You can define recurring reports that are automatically emailed to you:
- Daily report — every day at 8 AM the next morning
- Weekly report — every Monday
- Monthly report — the 1st of each month
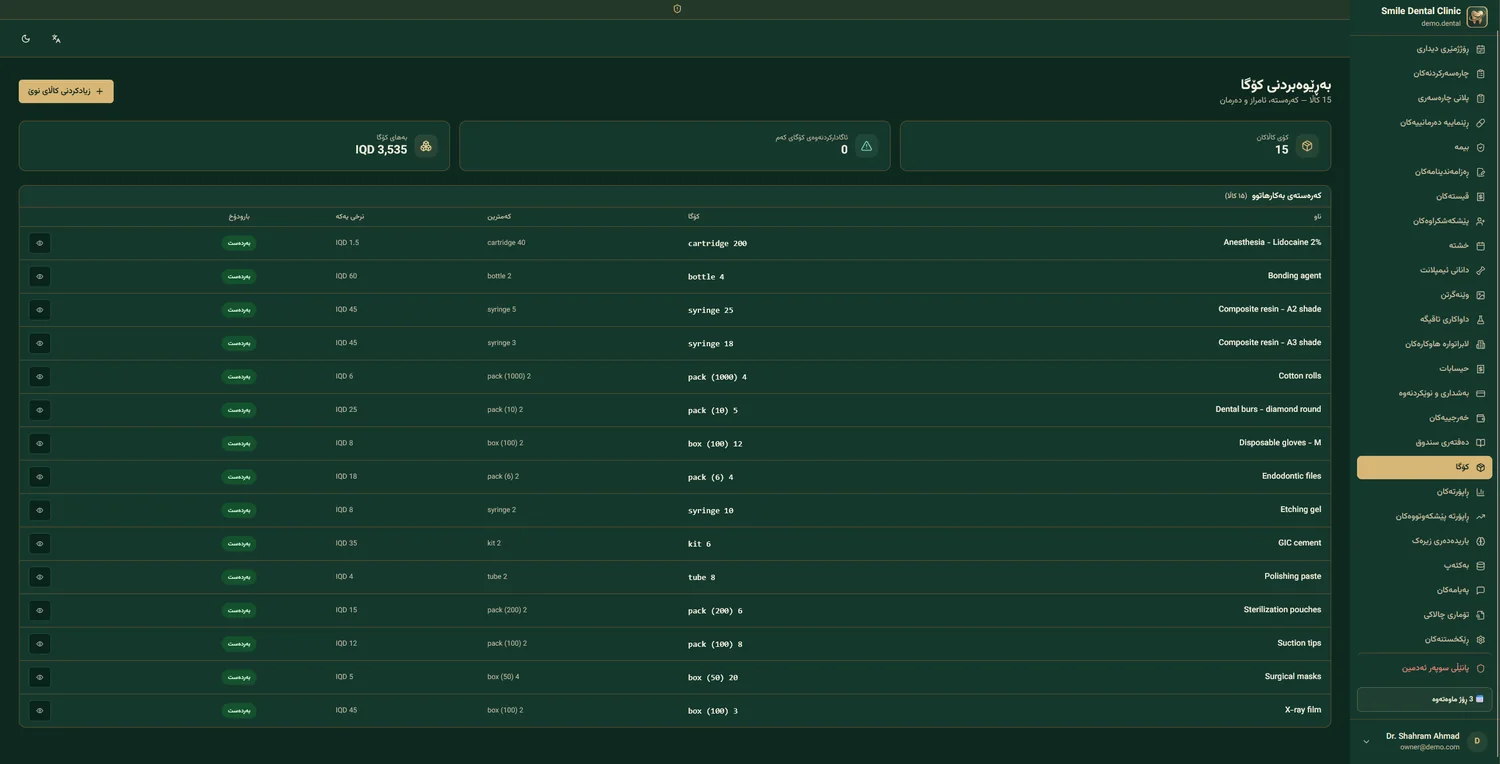
Inventory & Stock
Keep every clinic consumable under control — anesthetic, composite, gloves, burs and more. The Inventory page shows current stock, total value, and warns you before anything runs out.
What you see
📦 Total items
How many distinct materials are tracked.
💰 Inventory value
Total worth of stock on hand, in IQD.
⚠️ Low-stock alerts
Count of items at or below their minimum.
📋 Per item
Current quantity, minimum, unit price and status (in stock / low).
Add or edit an item
- Open the path 📦 Inventory→+ New Item
- Fill the fields Name, current quantity, minimum threshold, unit price, and unit (cartridge / box / pack).
- Save The item appears in the list with its status.
- Edit later Use the eye icon on any row to view or update it.
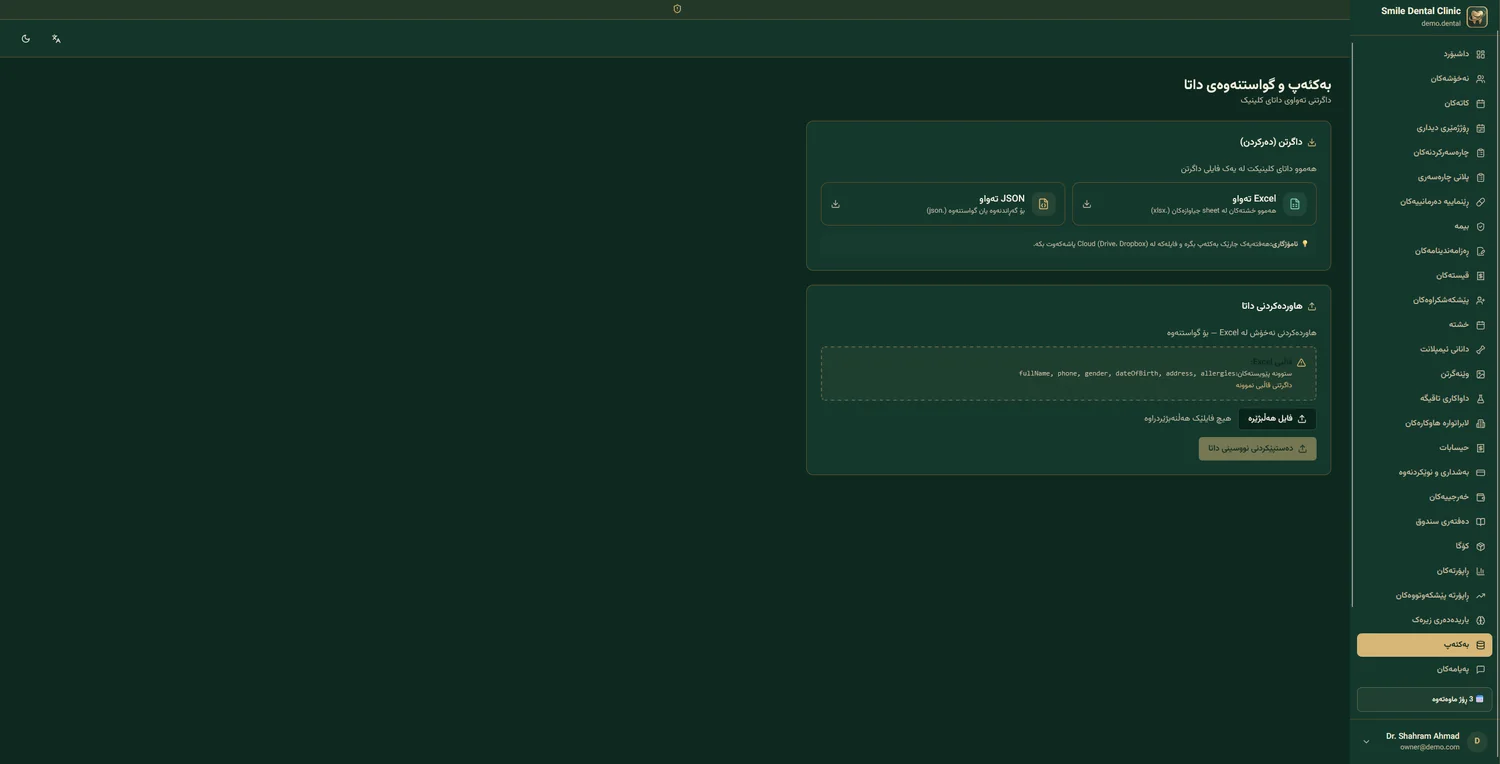
Backup & Data Export
Your clinic data is yours. Download a complete backup whenever you like, or bulk-import patients from a spreadsheet.
Download a backup
🧩 Full JSON (.json)
Every table in one file — ideal for migration or re-import.
📊 Full Excel (.xlsx)
Each table on its own sheet — easy to read and review.
Import patients from Excel
- Download the sample template It has the exact column layout the system expects.
- Use the required columns
fullName, phone, gender, dateOfBirth, address, allergies. - Choose your file and upload The system reads the rows and adds the patients.
- Or enter data manually Use the manual-entry option for a few records.
Suggested Daily Routine
If you are new and unsure which feature to use when, follow this routine. After a week, you will find your own rhythm.
☀️ Morning routine (9:00 — 9:15)
- Log in and check the dashboard See how many appointments today, how many new patients booked overnight, any important notifications.
- Check the calendar Open day view. Review the appointment order. Resolve any conflicts or issues.
- Check patient messages The “Chats” tab — if a patient messaged from the portal, reply.
- Lab orders Check if new orders arrived or any status changed.
🦷 During the day (9:15 — 20:00)
For each patient:
- Open patient record Click the appointment in the calendar — it opens the record directly.
- Check medical history Review warnings (allergies, conditions). 10 seconds — could save a life.
- Perform treatment Odontogram, treatment plan, radiology — whichever is needed.
- Prescription & notes After treatment, write a prescription (if needed). Explain it to the patient.
- Mark appointment as "Completed" One click. The system automatically schedules the thank-you message.
- Issue an invoice (reception) Reception issues the invoice, the patient pays, the receipt is printed.
🌙 End of day (20:00 — 20:15)
- Close daily cash Open the daily report. Reconcile amounts with cash and card.
- Confirm tomorrow's appointments Glance at tomorrow's schedule. Send a message to anyone who hasn't confirmed.
- Check reminders See which patients receive reminders tomorrow. Make sure the messages look right.
- Sign out safely Click "Logout" — especially if the computer is shared.
📅 Weekly tasks (Saturdays)
- Review weekly revenue report
- Review patients with debt — installment reminders
- Overdue lab orders
- Reply to patient reviews on the public page
📆 Monthly tasks (1st of each month)
- Last month’s financial report + comparison with previous months
- Last month’s doctor commissions (payout)
- Lab invoice (settlement)
- Plan the new month’s campaign
- Update prices (if needed)
💡 A golden tip
Spend 30 minutes every week reviewing the reports. This helps you spot trends early — e.g. “the no-show rate is rising” or “the last campaign had poor ROI”. Fast financial decisions make a big difference.
FAQ & Troubleshooting
❓ General questions
1. What if the internet goes down?
The platform runs as a PWA. Many features work offline (viewing records, Odontogram). Changes are queued and auto-sync when internet returns. For extra safety, keep a 4G modem as backup.
2. Is our data safe?
Yes. Each clinic has an isolated database. PBKDF2 encryption, 2FA, full audit log, daily backups. We never access your data — even support can only view with your permission.
3. How do I change my password?
Click your name (top corner) → My Profile → Security → Change Password. Enter current + new + confirm new. Save.
4. What if a staff member leaves the clinic?
Go to Settings → Users. Click the user. Press "Deactivate" (not delete). Their past data is preserved; they just can't log in anymore.
❓ Patient & appointment questions
5. The patient has no mobile. How do we register them?
Although a mobile number is required, you can use a family member's number (spouse, parent, child). Note in the comments whose phone it is.
6. How do we restore a cancelled appointment?
Open the appointment (calendar or patient file). Click "Change Status" and switch back to "Confirmed". If the time has passed, create a new appointment with a new date.
7. What if a patient is a no-show?
Change appointment status to "No-show". The system tracks no-show history and the AI warns you on future appointments. You can send a follow-up message.
❓ Prescriptions & invoices
8. I wrote the prescription wrong. How do I fix it?
If not yet printed: open the prescription, click "Edit", fix and save. If already printed and given to the patient: "Void" the prescription (with a reason) and issue a new one. The void record is kept.
9. I issued the wrong invoice. What do I do?
Open the invoice, "Void" it (with a reason). Create a new invoice. The old one stays in the archive marked "void" — never deleted (for accounting).
10. A patient isn't paying installments. What should we do?
The system auto-sends a reminder 3 days before due. If still unpaid, you can send a manual follow-up message. The "Patient Debts" report lists all debtors by priority.
❓ Technical issues
11. The page loads slowly. What do I do?
1) Test your internet (5+ Mbps recommended). 2) Clear browser cache (Ctrl + Shift + Del). 3) Use up-to-date Chrome or Firefox. 4) Still slow? Contact support.
12. Image won't upload.
Check: 1) Correct format (JPG, PNG for regular photos). 2) Size under 20 MB. 3) Internet not down. If still failing, compress with the TinyPNG app.
13. WhatsApp message not arriving.
1) Verify the mobile number with country code (like +964). 2) Check if the patient blocked you. 3) If still failing, see delivery status in the messages report.
❓ Support
14. How do I reach support?
Four ways: 1) Support WhatsApp (fastest, < 2-hour reply). 2) In-app ticket (Settings → Support). 3) Email. 4) Phone call (during business hours).
15. What if I want in-person training?
For clinics on the "Lifetime" plan, in-person/online team training is free. Others can order separate training services.
Affiliate & Commission Program New
Dr Dental IQ has a complete referral program that allows people to refer new clinics and earn lifetime commissions. This is one of our main growth channels.
How it works
- Sign up as an affiliate at
drdentaliq.com/affiliate/signup - Receive a unique code — like
DENT-AHMAD-2026 - Share the link like
drdentaliq.com?ref=DENT-AHMAD-2026 - Earn commission — every clinic that signs up via your link earns you 15% commission and gives them 10% off
Benefits for referred user
🎁 10% Discount
On first purchase (Yearly $449 instead of $499).
🎯 Extended Trial
5 days free + 2 extra days with a referral code.
Affiliate dashboard
After login at drdentaliq.com/affiliate/login:
- Live stats — clicks, signups, conversions, earnings
- Referral list — every referred clinic
- Payouts — payment history and withdrawal requests
- Settings — banking info, password
Commission payout
| Method | Min Amount | Payout Time |
|---|---|---|
| Iraqi bank account | $50 | 3-5 business days |
| ZainCash | $30 | Instant |
| USDT (TRC20) | $20 | 24 hours |
| PayPal | $100 | 1 week |
Online Payments with ZainCash New
The system supports ZainCash as the primary payment gateway for Iraq.
Prerequisite: ZainCash Merchant Account
- Visit ZainCash HQ or call
5151 - Request a Merchant Account
- Prepare clinic documents and ID
- After approval, you receive Merchant ID and Secret Key
Setup in the system
Navigate to Settings → Payments → ZainCash:
🏪 Merchant ID
Your merchant identifier.
🔑 Secret Key
Encryption key. Never share.
🧪 Test Mode
Test in Sandbox first.
📨 Callback URL
Set automatically.
Patient experience
- Patient sees the invoice
- Clicks Pay with ZainCash
- Redirected to ZainCash payment page
- Pays with ZainCash mobile app
- Invoice automatically marked paid
Other available gateways
| Gateway | Region | Status |
|---|---|---|
| ZainCash | Iraq | ✅ Active |
| FIB Pay | Iraq | 🆕 Soon |
| Qi Card | Iraq | 🆕 Soon |
| Stripe | International | ⏳ Testing |
| Bank transfer | All | ✅ Active |
Dr Dental IQ Mobile App New
The mobile app lets you manage your clinic from anywhere.
Download the app
📱 Android
From Google Play. Search: Dr Dental IQ.
🍎 iOS
From App Store. On iPhone and iPad.
Sign in
Use the same email and password as the web. Accounts are unified.
Key features
👥 Patients
List, search, add/edit, history
📅 Calendar
Daily and weekly views
💰 Invoices
View, pay via ZainCash
📸 Image upload
From phone camera
🔬 Lab orders
Create, track status
🔔 Notifications
Appointments, payments
Who uses the app?
- Dentist — view day's schedule
- Receptionist — phone bookings
- Technician — track lab orders
- Manager — daily financial reports
Privacy, Security & Notifications New
Dr Dental IQ uses cutting-edge security to protect clinic and patient data.
Data security
🔐 TLS 1.3 Encryption
All communications encrypted.
🔒 PBKDF2 Passwords
600,000 iterations.
📲 Two-factor auth
2FA with Google Authenticator.
💾 Daily backups
Every night.
Legal documents
- Privacy Policy —
drdentaliq.com/privacy - Terms of Service —
drdentaliq.com/terms - Cookies Policy —
drdentaliq.com/cookies
Cookie Consent (GDPR)
| Type | Description | Can disable? |
|---|---|---|
| Essential | session, language, CSRF | ❌ |
| Functional | theme, UI settings | ✅ |
| Analytical | usage stats | ✅ |
Real-time notifications
- New appointments appear instantly
- ZainCash payments without refresh
- Toast notifications on lab order updates
Push notifications (mobile)
📅 New appointment
When booked by receptionist
💵 Payment received
When payment confirmed
📦 Lab ready
When lab updates
💬 Patient message
When patient replies
Contact Support
If you have an issue or a question in any part of the system, the Dr Dental IQ support team is ready to help.
Contact channels
💬 Support WhatsApp
Fastest way · usually replied in under 2 hours during business hours.
Number: [enter your number]
For more complex issues or file attachments. Reply within 4 hours.
Email: support@drdentaliq.com
🎫 In-app ticket
From within the system: Settings → Support → + New Ticket. Tracked in place.
📞 Phone call
For urgent matters. Business hours 9 AM to 9 PM.
Phone: [enter your number]
🎥 Online meeting
For training or solving complex issues. By prior arrangement.
Zoom · Google Meet · Teams
🌐 Full documentation
Online guide with search and videos.
URL: docs.drdentaliq.com
Before contacting, prepare these
- Issue description — what you tried, what happened, what error message appeared
- Browser and OS — Chrome on Windows, Safari on iPhone, …
- Screenshot — if you see an error page, take a screenshot and send it
- Your account email — so we can find your account
Guaranteed response time
| Priority | Example | Response time |
|---|---|---|
| 🚨 Critical | System down, can't log in | < 30 minutes |
| ⚠️ Important | A feature isn't working, affects work | < 2 hours |
| 📝 Normal | Question, training needed | < 4 hours |
| 💡 Suggestion | New feature request | < 48 hours |
🤝 Our commitment to you
We don't just sell a product — we offer a long-term partnership. Every clinic, regardless of plan, has a dedicated Account Manager who is your first point of contact and last reference for all matters. When you succeed, we succeed.
Your feedback matters
If you have suggestions for improvement, or want a new feature, share with us. We release 1–2 new versions per month and many features have been added based on user requests.